Contouring for Beginners: Step-by-Step Guide
Contouring for Beginners: The No-Fail Guide
Contouring for beginners starts with understanding one concept: you are using darker shades to create shadows and lighter shades to bring features forward. You only need three products (contour shade, highlighter, and a fluffy brush), and the basic technique takes five minutes. The key is choosing a contour shade just 1-2 tones darker than your skin and blending thoroughly.
- Contouring = adding shadows with darker shades; highlighting = bringing forward with lighter shades
- You only need 3 products to start: contour shade, highlighter, and a fluffy blending brush
- Choose a contour shade 1-2 tones darker than your skin with a cool or neutral undertone (not orange)
- Placement varies by face shape: this guide covers round, square, and heart faces
- The #1 beginner mistake is using too much product; start with less and build up
- Cream contour is more forgiving for beginners than powder
What Contouring Actually Does
Forget the complicated diagrams. Contouring does one simple thing: it creates the illusion of shadows where you want features to recede, and light where you want features to stand out. That is the entire concept.
Your face naturally has shadows and highlights from ambient light. Contouring enhances and controls these, allowing you to subtly reshape the perceived structure of your face. A darker shade under the cheekbones makes them appear more defined. A lighter shade on the bridge of the nose makes it appear straighter and more prominent.
This is not about changing your face. It is about enhancing what is already there and creating the definition that flat, even foundation can wash out. Think of it as adding dimension back after base makeup has evened everything out.
The reason beginners struggle is that they overcomplicate it. They watch advanced tutorials with 15 steps and try to replicate them on day one. Start with the basics below, master them, and only then add complexity if you want to.
What You Need (Minimal Kit)
You do not need a 20-piece contour kit. Three products will get you started:
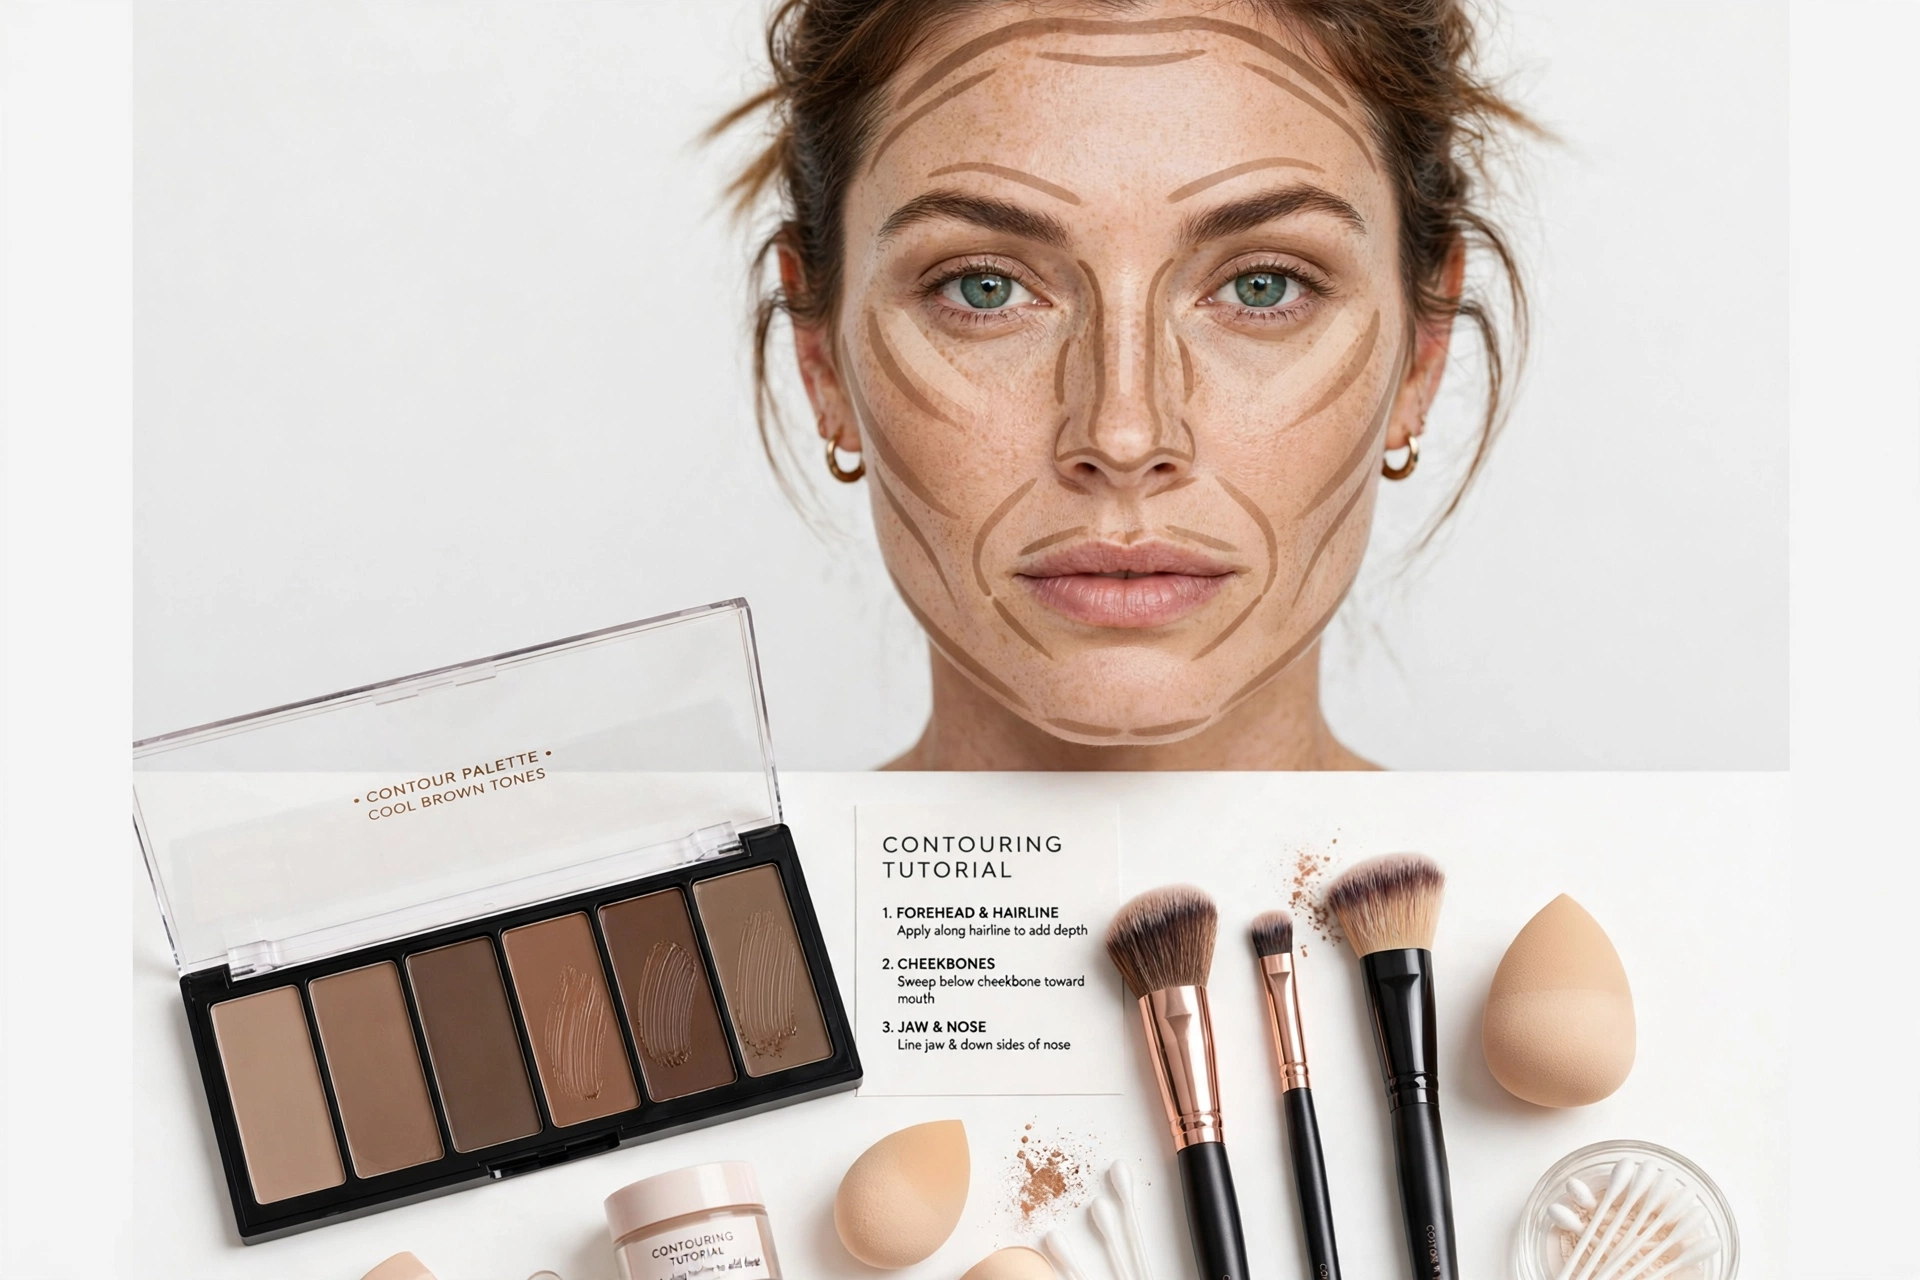
1. Contour product: Choose a matte shade 1-2 tones darker than your natural skin tone. The undertone matters enormously: look for cool or neutral undertones (taupe, soft brown), not warm or orange. Real shadows are cool-toned, so warm contour shades look unnatural. For beginners, a cream stick is easiest to control.
2. Highlighter: A shade 1-2 tones lighter than your skin, with a subtle sheen (not glitter). This goes on the high points: tops of cheekbones, bridge of nose, cupid’s bow, brow bone. A cream or liquid highlighter blends most naturally for beginners.
3. Fluffy blending brush: A medium-sized, fluffy brush (not dense or flat) is essential. The fluffiness diffuses the product and prevents harsh lines. You will also want a smaller brush or sponge for precise areas like the nose, but one main brush handles 80% of the work.
Optional but helpful: A damp makeup sponge for blending cream products seamlessly into the skin. This is the secret weapon for avoiding visible lines.
The Basic Technique (Step by Step)
Follow these steps in order. The entire process takes about five minutes once you are familiar.
Step 1: Apply base makeup first. Contour goes on top of foundation, not bare skin. Your foundation should be fully blended and set lightly if you are using powder contour (skip setting if using cream).
Step 2: Map the hollows of your cheeks. Suck in your cheeks slightly to find the hollow beneath the cheekbone. Using your contour product, draw a line from the top of the ear toward the corner of the mouth, stopping about two finger-widths from the mouth. Keep the line in the hollow, not on the cheekbone itself.
Step 3: Contour the temples and hairline. Apply contour along the hairline at the temples and across the top of the forehead near the hairline. This creates the frame that makes the face appear more sculpted. Use a light hand; this area is easy to overdo.
Step 4: Define the jawline (optional). Run contour just under the jawline from ear to chin. This adds definition, particularly in photos. Skip this step if you prefer a softer look.
Step 5: Contour the nose (optional). Using a small brush, draw two thin lines down the sides of the nose bridge. Blend carefully. Add a small dot of highlighter on the tip. This step is optional and requires the most precision, so skip it until you are comfortable with the basics.
Step 6: Highlight. Apply highlighter to the tops of the cheekbones (above where you contoured), the bridge of the nose, the cupid’s bow (the dip above the upper lip), and the brow bone. These are the high points that catch light naturally.
Step 7: Blend everything. This is the most important step. Using your fluffy brush (or damp sponge for creams), blend all edges until there are no visible lines. The contour should look like a natural shadow, not a stripe. Blend upward on the cheeks, not downward, to maintain the lifting effect.
Contouring for Round Faces
Round faces benefit most from contouring because the technique directly addresses the face shape’s characteristics: adding definition and the illusion of angles.
Focus areas: Cheek hollows (to create the appearance of cheekbones), temples (to add structure to the upper face), and jawline (to define the lower face). These three areas together create the angular contrast that round faces lack naturally.
Technique adjustment: Extend the cheek contour slightly longer than standard, bringing it closer to the mouth (but still stopping two finger-widths away). This elongates the cheek area visually. Use a slightly more angled line rather than a curved one.
Avoid: Contouring that is too wide or diffused, which can make the face look muddy rather than defined. Keep the placement precise and the blending controlled.
Contouring for Square Faces
Square faces have strong angles that contouring should soften rather than emphasize.
Focus areas: Temples and the corners of the jaw. Applying contour to these angular points softens them, creating a more oval appearance. Use a light hand on the cheek hollows; square faces already have natural definition there.
Technique adjustment: Blend the jaw contour carefully to avoid creating a harsh line. The goal is softening, not sharpening. Round the edges of your contour application rather than keeping them angular.
Highlight strategically: Emphasize the center of the forehead, the bridge of the nose, and the chin. Bringing these central areas forward balances the strong outer angles. For highlighter placement details, see our highlighter guide for square faces.
Contouring for Heart Faces
Heart faces (wider forehead, narrower chin) need contouring that balances the proportions: minimizing the forehead while adding definition to the lower face.
Focus areas: Temples and sides of the forehead (to reduce the appearance of width), and the jawline (to add definition to the narrower lower face). Go lighter on the cheek hollows since heart faces often have natural cheek definition.
Technique adjustment: Concentrate contour on the upper face. The forehead is the widest part, so this is where contouring has the most impact. Blend well into the hairline to avoid a visible line.
Highlight: Focus on the chin and jaw area to bring the narrower lower face forward. This creates balance with the wider forehead.
Common Beginner Mistakes
Using too much product: The number one mistake. Start with half the amount you think you need. You can always add more; removing excess is difficult. Tap off excess from your brush before applying.
Wrong undertone: Using a warm, orangey contour shade. Real shadows are cool. If your contour looks orange or muddy, the undertone is wrong. Switch to a taupe or cool brown.
Not blending enough: Visible lines are the hallmark of bad contouring. Blend until you cannot see where the contour starts and ends. When in doubt, blend more.
Contouring in bad lighting: Always check your work in natural daylight. Bathroom lighting (especially overhead) creates shadows that mislead you. Step near a window before leaving the house.
Following the wrong face shape guide: Contouring placement varies significantly by face shape. Using a guide for oval faces when you have a round face will give suboptimal results. Identify your shape first.
Skipping the mirror check: Contour looks different from different angles. Check the front, both sides, and slightly below. What looks blended straight-on may show lines from the side.
Cream vs Powder: Which for Beginners
Cream contour is more forgiving for beginners. It blends seamlessly into the skin, is easy to sheer out if you apply too much, and looks more natural. The downside is that it can move during the day on oily skin and requires setting with powder for longevity.
Powder contour is better for oily skin and lasts longer without touch-ups. However, it is less forgiving: mistakes are harder to blend out, and it can look cakey if over-applied. Powder requires a lighter hand and more precise brush work.
Our recommendation: Start with cream. The blendability gives you room for error while you learn placement and technique. Once you are comfortable, try powder for longer-wear days or if your skin is oily. Many experienced users combine both: cream for the initial application, powder to set and intensify.
Application tip for cream: Use a damp sponge in stippling (bouncing) motions rather than dragging. This presses the product into the skin for a seamless finish. For powder: use a fluffy brush in light, circular motions, building gradually.
Frequently Asked Questions
What do I need to start contouring?
Three products: a matte contour shade 1-2 tones darker than your skin (cool or neutral undertone), a highlighter 1-2 tones lighter, and a fluffy blending brush. A cream contour stick is easiest for beginners. You do not need an expensive kit; drugstore options work well when the shade and undertone are correct.
Is cream or powder contour better for beginners?
Cream is better for beginners because it blends more easily and is forgiving of mistakes. If you apply too much, you can sheer it out with a damp sponge. Powder is less forgiving and requires more precise technique. Start with cream, and try powder once you are comfortable with placement. For oily skin, powder may be preferable for longevity.
How do I contour for my face shape?
Placement varies by shape. Round faces: focus on cheek hollows, temples, and jawline to add definition. Square faces: soften the temples and jaw corners, highlight the center. Heart faces: minimize the forehead with temple contouring, define the jawline. Oval faces: light contouring to enhance natural structure. Always blend thoroughly regardless of shape.
What is the difference between contour and bronzer?
Contour uses cool-toned, matte shades to create the illusion of shadows and reshape the face. Bronzer uses warm-toned shades (often with shimmer) to add warmth and a sun-kissed glow. They serve different purposes: contour sculpts, bronzer warms. Using bronzer as contour is a common mistake that results in an orange, unnatural look because the warm undertone does not mimic real shadows.
Can beginners skip contouring?
Absolutely. Contouring is optional, not mandatory. Many people prefer a natural look with just foundation, blush, and highlighter. If you are new to makeup, master the basics (foundation, brows, mascara) before adding contouring. When you are ready, start with the minimal approach in this guide. There is no requirement to contour, and a well-executed simple look beats a poorly executed contoured one.