Highlighter Placement for Oval Face: Glow in All the Right Spots
An oval face is the shape makeup artists call the easiest to work with. Balanced proportions, gently rounded edges, and a forehead that is slightly wider than the chin mean you rarely need to correct anything — highlighter on an oval face is about enhancing what is already there. The right highlighter placement for oval face shapes adds light exactly where light naturally falls, so your skin looks luminous instead of shiny.
What Makes the Oval Face Special
Oval faces are longer than they are wide, with a jawline that tapers softly and no sharp angles or heavy areas. Because the proportions are already balanced, your goal is different from someone with a round or square face. You do not need highlighter to create width or fake structure. Instead, you use it to lift the center of the face and keep the overall look fresh and dimensional.
Think of highlighter as a spotlight. Wherever you place it, the eye goes there. On an oval face, you want the spotlight on the high points — the areas that naturally catch light when you turn toward a window.
The 3 Golden Rules of Highlighter for Oval Faces
Rule 1: Highlight the center, not the sides. Oval faces do not need extra width, so keep shimmer away from the outer edges of the face, the temples, and the sides of the jaw. Concentrating glow down the middle keeps the face looking long and refined.
Rule 2: Blend more than you think you need. Because oval faces are smooth and balanced, harsh lines of shimmer stand out immediately. Use a light hand and a fluffy brush, then blend the edges until there is no visible line where the highlighter starts.
Rule 3: Match intensity to the occasion. A sheer, skin-like glow works for daytime and office wear. Save the blinding, metallic finish for evenings and photography. The placement stays the same either way — only the product changes.
Where to Put Highlighter: Step by Step
1. The center of the forehead
Sweep a small amount of highlighter down the center of the forehead, between the brows and up toward the hairline. Keep it in a narrow vertical strip — about the width of two fingers. This lifts the center of the face and makes the skin look smooth. Avoid spreading it across the whole forehead, which can make the area look wider than it is.
2. The brow bone
Apply a thin line of highlighter directly under the arch of each eyebrow, then blend upward into the brow. This single step opens up the eye area and gives the whole face a lifted, awake look. A matte or satin finish works best here for daytime; reserve glittery formulas for the cheeks.
3. The high points of the cheekbones
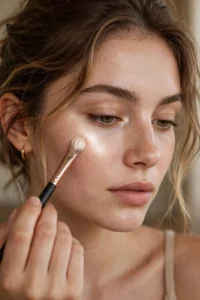
This is the most important placement. Smile lightly to find the tops of your cheekbones, then sweep highlighter along the upper edge, starting near the outer corner of the eye and moving toward the temple — but stop before you reach the temple itself. On an oval face, keeping the glow on the cheekbone rather than dragging it outward preserves the face’s natural length. For a guide to how placement shifts on other shapes, see highlighter placement for round face and highlighter placement for heart-shaped face.
4. Down the bridge of the nose
Run a thin line of highlighter down the center of the nose bridge, from between the brows to just above the tip. Stop before the very tip to avoid making the nose look bulbous. This draws the eye down the center of the face and adds a subtle, elegant slimming effect. If your nose is on the longer side, keep the line shorter and skip the tip entirely.
5. The cupid’s bow
Dab a tiny amount of highlighter on the cupid’s bow — the small dip above the center of the upper lip. This catches the light when you talk and smile, and it makes the lips look fuller without any lip liner tricks. Less is more here; a grain-of-rice-sized amount is plenty.
6. The center of the chin
Place a small dot of highlighter in the center of the chin, just below the lower lip, and blend it out. On an oval face the chin is naturally tapered, so a touch of light here balances the glow on the forehead and keeps the vertical harmony of the face. Skip this step if your chin tends to get oily during the day, since shine plus oil reads as grease.
7. The inner corners of the eyes
Finish with a pinpoint of highlighter in the inner corner of each eye. This brightens the whole eye area, makes you look more awake, and ties the glow together. It is the smallest placement on this list but one of the most noticeable in photos.
Choosing the Right Highlighter Formula
Powder highlighter is the most forgiving for beginners. It is easy to control, builds up gradually, and works well over foundation and setting powder. Choose a finely milled powder with no visible glitter particles for a natural finish.
Cream or liquid highlighter gives a dewier, skin-like glow and is ideal for dry or mature skin. Apply it with your fingertips or a damp sponge before setting powder — or skip powder on the highlighted areas to keep the glow alive. Creams can slide on oily skin, so set the surrounding areas well.
Stick highlighter is convenient for touch-ups and travel. Swipe it directly onto the high points and blend with your fingers. The finish tends to be more intense, so use a light touch.
For shade, fair to light skin tones look best in champagne and pearl; medium skin glows in gold and peach; deep skin tones shine in bronze and copper. The undertone matters more than the depth — match the highlighter’s undertone to your skin’s undertone for the most natural result.
Mistakes to Avoid
- Highlighting the jawline or temples. On an oval face this adds width where you do not need it and can make the face look rounder.
- Using too much product. Highlighter should look like light hitting skin, not like a stripe of makeup. Start with half of what you think you need.
- Skipping blending. Unblended edges are the most common beginner error. Blend until you cannot tell where the highlighter begins.
- Pairing heavy highlighter with heavy contour. If you contour strongly and highlight strongly, the face can look striped. Keep one of the two subtle.
- Applying over flaky or unprepped skin. Highlighter emphasizes texture. Exfoliate gently and moisturize before makeup so the glow sits smoothly.
FAQs
Can I wear highlighter every day with an oval face?
Yes. For daily wear, choose a sheer, finely milled formula and stick to the cheekbones, brow bone, and inner eye corners. It reads as healthy skin rather than obvious makeup.
Should oval faces contour as well as highlight?
Light contouring under the cheekbones can add definition, and it pairs beautifully with the cheekbone highlighter placement above. Keep the contour soft and well blended so it does not fight the natural balance of the face.
What brush is best for highlighter?
A small, tapered fluffy brush gives the most control for powder highlighter on the cheekbones and nose. Use your ring finger for cream formulas on the cupid’s bow and inner corners, where precision matters.
Does highlighter work on mature skin?
Absolutely — in fact, a soft glow is more flattering on mature skin than matte flatness. Choose satin or cream finishes without chunky glitter, which can settle into fine lines, and focus on the cheekbones and brow bone.
Get Your Glow Right
Once you know your face shape, highlighter stops being guesswork. If you want to double-check your shape before you start, try the free AI face-rating tool at Russella — upload a photo and get an instant analysis of your facial proportions, so every placement tip on this page lands exactly where it should.